After finishing the last post I felt I should do something constructive to my car. I had bought a set of KYB Gas charged shocks to replace the tired air shocks in the back. These are not the heavy duty high performance models, these are like an upgrade from stock, the Excel G. After a twenty five mile test drive I hope they break in a bit. I would have liked them a little softer. I'm not a fan of the punishing ride. When I ordered these from Rock Auto I saw that these were eligible for a 45.00 rebate. This time I downloaded the form. When the shocks arrived I sent it and the box ends in to KYB, A month later I received the check. Not bad. This brought the total cost of the shocks to around 50.00. This is the first time I have ever returned a rebate form but 45.00 is a fair amount of change.
I've had the shocks for a few months but hadn't gotten around to installing them. I've got a few more parts sitting around that I should install. I installed the new fuel level sending unit and the front spoiler. I don't want to be the guy that puts his car up for sale with a bunch of new parts in the trunk.
I find that the best thing is driving my car. It makes me appreciate it more. It starts up easy and runs real smooth. Cruises easy at 65-70 mph. What more do I need? At this point, nothing but I've got a roving eye. There's a consignment lot in Santa Clara called Wheels and Deals. This place has been around for quite a while. I've bought two cars from there and sold one. It's a great place to see a wide cross section of different cars and the best thing is, there are no salespeople. I can wander around checking out Bimmers, MBZs, muscle cars all kinds of stuff. I saw a beautiful 66 GTO parked there at the curb today. It was blue and the bodywork and paint were straight as glass and twice as glossy. I can appreciate a car like that but I know that I will probably never have one that nice. I would guess that the paint and bodywork alone was probably 25 grand. It would probably be hard to recoup most of your investment at sales time. Still the fact that there are guys that can write a bunch of big checks shouldn't have any effect on how much we enjoy our cars.
This beautiful black, up and running Benz is offered at 3,500!
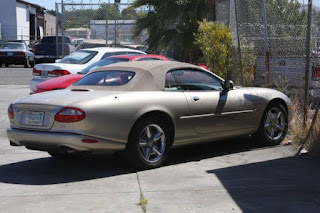
There are a bunch of one time high dollar cars that are approaching the bottom of their depreciation curve. MBZs such as SL models from the 70s,80, and even 90s are bottoming out at less than five grand. I saw a beautiful 92 MBZ SL 300 that was offered at 3,500 bucks. Sl 500s at around five grand, Jaguars, not just XJS' but XK8 convertibles at 3,500 to 5,000 bucks. Big Bimmers are similarly priced. Now there is a reason that they are so cheap. While some are fixers, (actually priced from 1,000 to 2,500 dollars) most are currently running functioning cars. Of course that's the rub. How long will they be running? No one knows. Truthfully no one can predict. You might buy one and enjoy a couple of years of service or it might die a terrible death right after you drive it home, It's all supply and demand. Not many people are demanding their chance at automotive Russian Roulette. So the prices are low, and the sellers are motivated, really motivated.
This 12 cylinder Benz is offered at 3,500.00
This jag was described as "beautiful luxury car, runs great" 3,500.00
This jag looked beautiful from every angle and from inside. It's got "engine problems" and they are asking 2,500 bucks. I bet they would take 1,500 (or even less) in a heartbeat
Still if one of these is your dream car, this is your chance at greatness. I just saw a 12 cylinder Mercedes coupe that cost one hundred and twenty thousand dollars new in the mid eighties, selling for 3,500 bucks or offer. And it had 20in. chrome wheels, new tires, straight body,great paint and a clean interior. Personally I lust after a Jag. I was thinking of an XJS, maybe with a 12, but maybe a later XK8. These are the brother to the vaunted Aston Marten V8, which believe me ain't on this depreciation trajectory. Yes I have visited the forums and even the late 90s Jags still have terribly unreliable electrical systems. It seems that most of their problems are electrical based, no complaints on the forums of these cars throwing rods, just iffy trannys. If you or I were to buy one of these gems I would choose one with the great body, paint, interior equation and currently registered and running. I would hope that I could enjoy it for at least a little while before the work starts.
I would need a garage to keep it in, and where I could work on it. I would just assume that I'm not going to drive this like my 96 Mustang which I would definitely keep. Yes, have at least one reliable easily fixable daily driver you can depend on. Like I read on another forum, a car like this is not just a purchase, it's an adventure, a relationship and a dream come true. Life is too short to deny your dream. let me know how it turns out.
Saturday, July 25, 2015
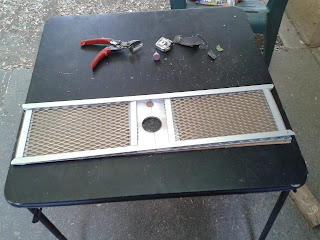
Now that the basic frame has been built and fit, it's time to cut the aluminum strap that will "sandwich" the mesh. The upper and lower straps are just a duplicate of the one's you already cut. Then I cut four "uprights" that will bridge between the top and bottom straps. I laid everything down on the table to mock it up. Then I painted all the parts. I know that I am probably going to scratch up some of the parts on assembly, but I'll just shoot another coat when I'm done. It would be too hard to get proper coverage if I tried to paint it once it was assembled.
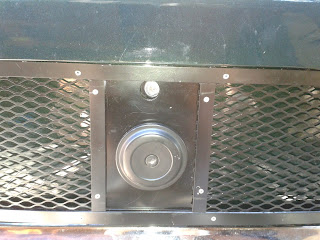
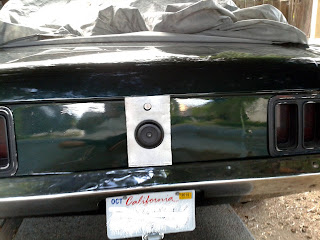
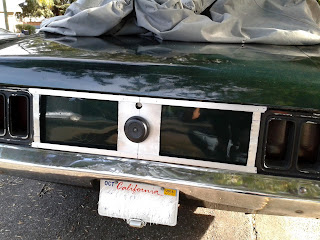
I was going to mount this by screwing it to the underlying body panel. I drilled a hole at each end of the top straps and the bottom straps Earlier I had removed the screws holding the gas filler neck, I was planning on using one of these screw positions to mount the panel also. I placed the panel into position using strips of blue painters tape to secure it temporarily. I lined it up and drilled one screwhole into the body panel. I screwed this down loosely then drilled another hole while maintaining alignment. This screw was tightened down a bit. The alignment looked pretty good so I drilled the bottom holes and installed the screws. I was very satisfied with the look. I removed the panel and re installed the filler neck screws except for one. I had thought of painting the underlying body panel black also. After mounting the new mesh panel I liked the effect of seeing the green color through the mesh. The contrast made the panel stand out a little more so I left it as it was. After I mounted the four screws I drilled a hole through the filler neck mount from inside the trunk and ran a screw through the body panel and my new panel. I ended up dilling another screw to mount the panel under the filler neck and I was done.
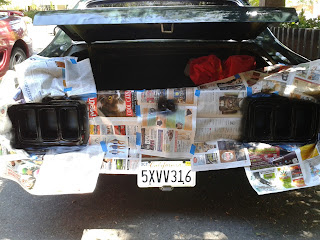
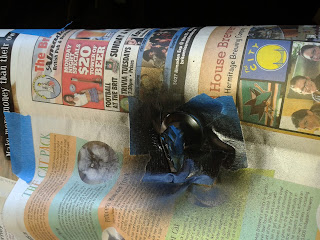
I had painted the tail light housings after masking the lens. I also painted the trunk lock bezel. The lights were painted black when I bought the car but the refresh really made the whole thing pop
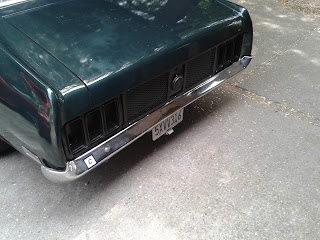
The addition of the tail light panel matches the texture of the grille which gives my car a cohesive design. This was part of my goals. I wanted to do improvements to my car that complemented each other. Visible in this picture is the Boss 302 front spoiler that I installed. It's made of black plastic which matches the other accessories and gives my car that competition look. This is a common piece that cost me less than 75.00. It also has some actual aerodynamic benefits. I drove down to Santa Maria for a car show in May, a round trip of over 460 miles. The car ran great, but I was disappointed in the gas mileage. I only averaged 15 mpg at 65 mph. I later ran a 100 mile fuel economy check at 55 mph. Fuel economy was 17 mpg. Before I installed the spoiler I did some coast down testing. I found that it took 14.5 secs. to coast down from 55 mph. to 35 mph. After the installation of the spoiler coast down time had increased to 15.0 secs. This means that aerodynamic drag had been reduced a bit, this should hopefully result in somewhat improved fuel economy. I plan on trying some other improvements. If you look at the front of the car, the body curves under which exposes the the entire front of the wheel to the oncoming airstream. The air can flow over the tire and into the fender well and will have to exit from around the wheel well opening and out the side, causing a lot of drag. if you look at at any modern car from the front, you will notice the the bumper or fender extends past the front of the tire. The oncoming air is directed around the tire to the side side the car preventing the air from entering the front wheel well. Originally my plan was to build a panel straight down from the front bumper and around the sides to the front of the fender opening. This is the kind of front air dam used by top speed racers at Bonneville. I think it looks cool, but it might be a bit much for a six cylinder street car. So my plan is to add a panel to the front valance panel that will cover the front of the wheel and divert air to the side. I was going to try to fabricate something but then I had an idea. There might be an existing "found shape". Something that exists already and could be adapted to work. Well I think I have just the thing. I'll get into that on another post. On my next post I'll describe how I built the front grille.
Next I laid the mesh and bottom strap down on the base frame. I was going to start from the bottom making any adjustments for fit as I went along. I now drilled through the three layers of material. I clamped the parts with some strong spring clamps to the wooden board and drilled the holes. After I
did each section I riveted each one down. I drilled through the top strap, assembled that then fit the uprights. I fitted them making any needed adjustments, I had to file one which was a little too long. Then riveted them down. Be sure that your rivets are long enough to secure all three layers. I had to make a quick trip back to OSH.
I was going to mount this by screwing it to the underlying body panel. I drilled a hole at each end of the top straps and the bottom straps Earlier I had removed the screws holding the gas filler neck, I was planning on using one of these screw positions to mount the panel also. I placed the panel into position using strips of blue painters tape to secure it temporarily. I lined it up and drilled one screwhole into the body panel. I screwed this down loosely then drilled another hole while maintaining alignment. This screw was tightened down a bit. The alignment looked pretty good so I drilled the bottom holes and installed the screws. I was very satisfied with the look. I removed the panel and re installed the filler neck screws except for one. I had thought of painting the underlying body panel black also. After mounting the new mesh panel I liked the effect of seeing the green color through the mesh. The contrast made the panel stand out a little more so I left it as it was. After I mounted the four screws I drilled a hole through the filler neck mount from inside the trunk and ran a screw through the body panel and my new panel. I ended up dilling another screw to mount the panel under the filler neck and I was done.
I had painted the tail light housings after masking the lens. I also painted the trunk lock bezel. The lights were painted black when I bought the car but the refresh really made the whole thing pop
The addition of the tail light panel matches the texture of the grille which gives my car a cohesive design. This was part of my goals. I wanted to do improvements to my car that complemented each other. Visible in this picture is the Boss 302 front spoiler that I installed. It's made of black plastic which matches the other accessories and gives my car that competition look. This is a common piece that cost me less than 75.00. It also has some actual aerodynamic benefits. I drove down to Santa Maria for a car show in May, a round trip of over 460 miles. The car ran great, but I was disappointed in the gas mileage. I only averaged 15 mpg at 65 mph. I later ran a 100 mile fuel economy check at 55 mph. Fuel economy was 17 mpg. Before I installed the spoiler I did some coast down testing. I found that it took 14.5 secs. to coast down from 55 mph. to 35 mph. After the installation of the spoiler coast down time had increased to 15.0 secs. This means that aerodynamic drag had been reduced a bit, this should hopefully result in somewhat improved fuel economy. I plan on trying some other improvements. If you look at the front of the car, the body curves under which exposes the the entire front of the wheel to the oncoming airstream. The air can flow over the tire and into the fender well and will have to exit from around the wheel well opening and out the side, causing a lot of drag. if you look at at any modern car from the front, you will notice the the bumper or fender extends past the front of the tire. The oncoming air is directed around the tire to the side side the car preventing the air from entering the front wheel well. Originally my plan was to build a panel straight down from the front bumper and around the sides to the front of the fender opening. This is the kind of front air dam used by top speed racers at Bonneville. I think it looks cool, but it might be a bit much for a six cylinder street car. So my plan is to add a panel to the front valance panel that will cover the front of the wheel and divert air to the side. I was going to try to fabricate something but then I had an idea. There might be an existing "found shape". Something that exists already and could be adapted to work. Well I think I have just the thing. I'll get into that on another post. On my next post I'll describe how I built the front grille.
Sunday, July 19, 2015
Building a custom tail light panel or grille
I have been reading Hot Rod magazines since I was a kid, well over forty years ago. I always wanted to customize my car as I built it, not only the motor and chassis but also visually. Since my my current 70 Mustang was lacking a grille and turn /signal parking lights I got the opportunity to do just that. I decided to build a custom grille with turn signals and driving lights hidden behind the mesh. I built the grille before I made the tail light panel. The method and materials were very similar. I will show how I built the tail light panel first, as I had not documented the process of building the grille. I will then discuss how the frame of the grille was constructed. Even though I once knew how to weld and had bought a cheap wire welder at Harbor Freight I felt it would be simpler to use hand tools and readily available materials. I chose steel mesh available in panels at my local Orchard Supply Hardware store. I used aluminum strap, angle "iron" scrap sheet aluminum, screws and pop rivets. I used a hacksaw, metal snips, hand drill and a couple of holesaws to make some openings. For this particular application; a panel to cover the stock sheetmetal panel between the tail lights I would have to provide an opening for the fuel tank filler neck and truck lock.
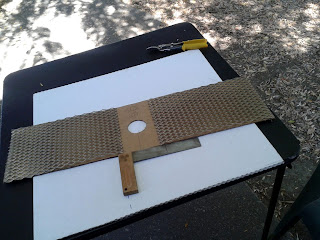
The first thing I did was to measure the dimensions, then cut a cardboard template to fit the opening. Since I had already built a grille using similar materials and methods I was confident in the process.
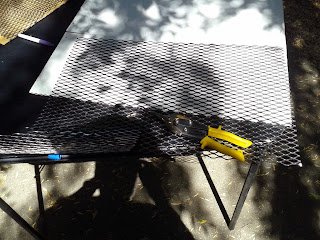
I laid the mesh panels on top of the template and marked the cuts with a magic marker. I cut them with a a pair of metal snips. I cut one, positioned it on the template to make sure that it was the right size, than cut the other panel. You could use a hacksaw or cut off wheel just as well.
I mounted the frame under the filler cap for a look see. Not too bad. I tried to contour the upper and lower strips to conform a bit to the tail light housings. What I could have done was to mock up the top and bottom strips by using a flat wood molding, then I could have made a much nicer fit to the tail light housing. Then I could have transferred the contour to the aluminum strap. Truth is I didn't feel like driving to OSH for the wooden molding. I guess I could have used a piece of card stock also. It would have made a better quality job and only taken a little more time. This is really where the difference in craftsmanship makes itself known. Take more time, measure twice, cut carefully. Take time to "massage" the fit. You can do an outstanding job if you don't rush it. Still pretty good for a beater. I will continue the journey on my next post.
The first thing I did was to measure the dimensions, then cut a cardboard template to fit the opening. Since I had already built a grille using similar materials and methods I was confident in the process.
The template is your guide, if it fits in the space and you build the panel to fit the template there should be no problem. However if your car is like mine and has been banged up and not repaired exactly correctly there will need to be an "adjustment" factor. My rear panel was kind of wavy, the filler neck was a little tweaked, and the bumper was bent a little. Come to think of it the tail light assemblies were a little wonky too. Don't let this faze you, just build it as if your car just came off the showroom floor. I did establish a center line for the template to locate the filler opening. I then made another small template to position the trunk lock opening. I should have made a preliminary light paper template, then transferred both of the locations to the cardboard. I just introduced more opportunities for mis- alignment. I also wanted to use some scrap aluminum sheet for the center of the panel. If you are careful to square up all your measurements and cuts I guess it would be okay, I just wanted to be in the "re-purposing" groove. I used the sliding shade panel from a 70's Buick sunroof I had laying around. I had used this for part of the grille too. It just makes it harder to make accurate measurements, since you don't have a "factory" straight side to use as reference. Still it can be done successfully.
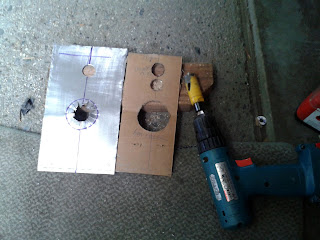
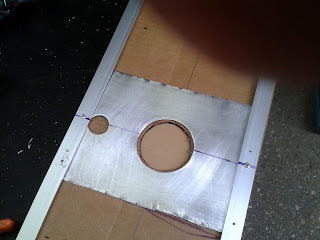
I mocked up the panel by placing the mesh panels over the center panel. I still needed to cut out the opening for the filler neck and trunk lock. I had a small hole saw, approx. one inch, from a wooden door lock mounting kit. I drilled the small hole for he trunk lock easily. I used the saw to drill a center hole for the filler neck opening which I enlarged with tin snips. Not a real good idea. I couldn't make an accurate circle and tried to grind it smooth with a rotary stone. After some frustration I went and bought a 2 1/4 hole saw at OSH and made a new center panel. This came out much more satisfactorily.
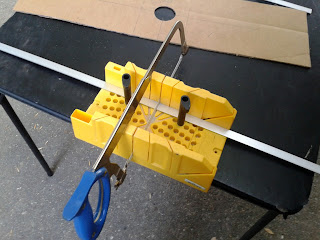
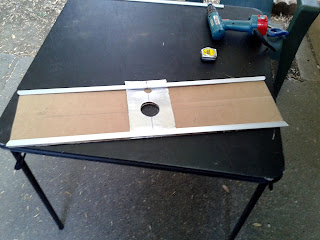
Now I had two mesh panels, a center panel and I had to build a frame to hold them. I was going to build a frame work out of 3/8 in. flat aluminum stock. Two long strips on the top and bottom and two shorter ones on the ends. I had initially used screws to hold the grille frame together as I mocked it up, but this time I felt it would be easier and quicker to use some short aluminum rivets to put the frame together. I assembled these directly on my template. I placed a wooden panel under the template so I wouldn't drill into my table. I used just one rivet at each connecting point. This frame was going to be covered by the mesh panels and another set of aluminum strips. The mesh is sandwiched between the inner and outer panel.
I mounted the frame under the filler cap for a look see. Not too bad. I tried to contour the upper and lower strips to conform a bit to the tail light housings. What I could have done was to mock up the top and bottom strips by using a flat wood molding, then I could have made a much nicer fit to the tail light housing. Then I could have transferred the contour to the aluminum strap. Truth is I didn't feel like driving to OSH for the wooden molding. I guess I could have used a piece of card stock also. It would have made a better quality job and only taken a little more time. This is really where the difference in craftsmanship makes itself known. Take more time, measure twice, cut carefully. Take time to "massage" the fit. You can do an outstanding job if you don't rush it. Still pretty good for a beater. I will continue the journey on my next post.
Subscribe to:
Posts (Atom)


