
 |
| Kind of like the Bible for my old Jag. |
I post a lot on the Jaguar Forums, and I'm documenting the running story of my Jaguar obsession there also. On this blog I have a greater freedom of subject matter and I discuss my history with cars and motorcycles. Sometimes there is going to be some overlap. But my Jaguar story is a big part of my blogging identity. So I'm always going to cover it here. It's not like there is anyone reading this stuff anyway.
 |
| Surprisingly, there wasn't as much room as I would have thought. |
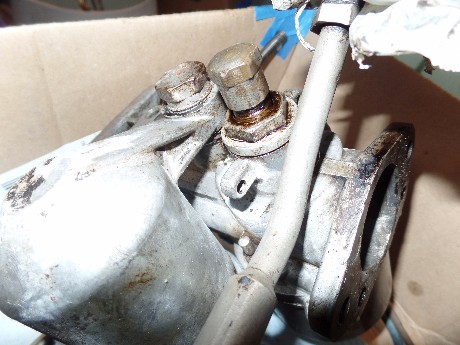
I started working on the Mark, because I really think that it will turn out to be a runner. I found that the front carb was stuck shut. I thought that the throttle valve was stuck somehow. I decided to pull the carbs to see what the problem was and unstick it. Even though the motor is a straight six, it wasn't as easy to take off the eight bolts holding the carbs on. I could see that the auxiliary starting carb was attached to the front carb and had a solid pipe that connected it to the intake manifold. Of course it wasn't as easy as it looked. I decided that it would be best to remove the rear carb first, and this did free up more space and access to the front carb. I removed the carb and saw that the throttle valve looked okay, and it must be the throttle shaft that was stuck. I soaked it with Liquid Wrench for a couple of days then moved the shaft carefully with a vise grip. It was stiff but moved a little I added more penetrating oil and worked it back and forth gently until it was free. I cleaned all the caked on crud. As I set the carb down a piece fell off the bottom. It is from the bottom of the carb called the needle jet bushing. How did I know that it was called that?
 |
| That little cap had been cracked for awhile. |
 |
| This is what it should look like. |
I looked on the Net and saw some brand new repair manuals for the Mark. These were available from Brooklands Books. These were combination manuals that included the old XK series also. I was looking for something cheaper and lucked out and found an official ROM for the Mark on Amazon. This is the actual book used by mechanics in their shop. It was in great shape and only 30.00. This book is very clearly written, with great pictures and diagrams. Just a delight to read. Which is just what I did. I spent a couple of hours reading through the book familiarizing myself with the mechanicals of my old Mark. Since I had already spent several hours looking at and crawling under the car the info really had a chance to gel.
 |
| Lot's of good reading inside. I've got a whole collection of these road test books. |
Of course I also wanted the Brooklands Books road test anthology for the Mark VII. I love reading those old road tests and you can learn a lot from them. A lot of times the testers will smooth over problems, but generally they treat the cars just as cars, not the icons that they later became. Those darn Brooklands Books, they started this whole Jaguar hysteria for me when I picked up their anthology for the XJS!
Back to the broken piece. It appeared that this had been cracked for a good long time. Twenty six years maybe? Maybe I hit it when I was using the rubber mallet to encourage some cooperation upon removal. Now I was kind of bummed, I thought I was just going to clean things up and fire the car up. Now I had a 65 year old carb part that I needed bad. I put out an inquiry to SNG Barrett and they said that they didn't carry it. What now? I was quite concerned that I would have to find some one with an old carb that would be willing to sell me the part. With the continuing popularity of the XK series I figured that there had to be parts available somewhere. I searched the web, looking for the manufacturer of SU carbs and found a bonanza of a website. Every part was available, and for a fairly reasonable price. I ordered the parts and a couple of carb rebuild kits.
I decided to check out the distributor and points. The vacuum canister was as I would have suspected DOA. The rest of the stuff looked okay. While up in Oregon, I had contacted a company named British Parts Northwest. They are having a close out on many old Jag parts, many which are common to the XK series. Ignition points, other distributor parts, a clutch set, coils, and oil filters are being closed out at what appears to be bargain prices. I checked the prices against Parts Geek and Rockauto and they are noticeably cheaper. I imagine that they would be quite a bit cheaper than SNG Barrett but it's good to check.
An oil change was next. I noticed that the previous owner had installed an additional canister oil filter. to the left inner fender. It looked like the one that was in my '56 Cadillac. This was plumed from a fitting in the lower rear of the block and drained into the cam cover near the filler cap. This seemed like a good idea, more oil means a cooler running engine and longer engine life. The canister was mounted with one small old bolt and a bent nail! Even better was what was inside.
 |
| There's that added filter. I should have taken a picture of the nail. |
 |
| Toilet paper, a can and a home made spacer. |
 |
| Nothing like ingenuity. |
Instead of the filter element I was expecting to find I discovered what looked like an inverted tin can. Because that was exactly what it was! Inside that can was a very dirty roll of toilet paper. The owner had made a wavy spacer and screen to fit under the roll. I remember that back in the day, there were a lot of people ( mostly very cheap people) that thought that toilet paper made a better, less costly replacement for the original canister filter elements. I guess that over time, the proper filters got harder to find at the discount auto stores, though my local small chain auto parts store, Winchester Auto, had no problem ordering one for my '56 Cadillac. I guess saving a couple of bucks was kind of important to folks back then too.
The previous owner was an engineer, and he got older he had his own ideas on how to improve his car. I have found many little modifications that I will have to figure out. I may own this car now, but it will always be HIS car!
I will work on the brakes while I wait for the carb part to show up from Great Britain. It is amazing to me that those old tires are still holding air. They are totally cracked and weathered but the tubes are still standing proud. Antique tires to fit this car are not easy to find. What I really mean is that they are not cheap to find! Usually I would just find a modern tire that could be used as replacement. They are 6.50 x 16 inchers. The rim is rather narrow, five inches. The current tires have those super tall, pie crust sidewalls with a very narrow tread. I'll bet those squealed going around corners. A modern tire will have a much shorter sidewall, and my biggest concern is whether or not they would clear the rear fender spats.
I have found several good suppliers of proper radials for my car advertised in Jaguar World magazine. These would be the proper modern replacements, but a set will set me back around a grand, more than I paid for the car.
I will keep my eyes open on Craig's List, maybe I can find a used set of suitable tires.
The brakes were locked up so I disassembled them and tried to take apart the wheel cylinders. I tried putting them in a vise to compress them a bit a break free the pistons. That didn't work. I tried placing it in my press and that did succeed in depressing them about a quarter inch. I doused them with Liquid Wrench and let them sit. I then tried to use air pressure to get them loose. There is only one piston on these wheel cylinders, that's why the system uses two wheel cylinders. There were some early 50's Chrysler models with a similar setup. Dual leading shoe brakes. I remember this system was used on many high performance motorcycles before disc brakes were adopted. Each shoe is pressured, this results in greater shoe friction and better stopping power. At least when proceeding in a forward direction, rolling backwards they were not so effective. The rear brakes were the conventional design. The previous owner told me that his Dad had removed the vacuum booster, I'll have to take a look at those later. He included two different type boosters with the car. The system is similar to the HydroVac system used on my '56 Cadillac.
I tried the old compressed air method and found some success with one cylinder. I tried to turn one piston with a wrench and it moved a bit. A bit of working back and forth, more Liquid Wrench and then the air popped out the piston. Inspecting it I didn't find the pitting I expected, instead it was more like the piston had been stuck with mucilage.
I had read that it was possible to use a grease gun to remove the pistons. If a grease fitting can be screwed into the line port or the bleeder screw than it could be pumped full of grease forcing out the shoes. I've read that up to one thousand psi could be obtained. My cylinders have rather large line fittings, 3/8 ths of an inch, much bigger than any available grease fitting I found. I have considered drilling out a bolt and tapping it to allow for the grease fitting. A lot more work than I really need, but I might have to try it. There are four more cylinders waiting for me.
The second cylinder is still stuck solid. Today I tried putting it in the press without any success. Then I dot the great idea to place a socket over the piston and strike it with a hammer, maybe a little shock would break it loose. I initially held it in my hands and used a small hammer. Then I placed it on the concrete and used a small sledge. Bad Idea, The impact cracked part of the mounting system. It looks like it isn't critical still will hold with the broken rim, but the cylinder will need to be replaced.
I've tried to source some new or rebuilt cylinders from Worcester Classic Spares in GB. The price is 600 Pounds with a 400 Pound core charge, refundable only if the cores are rebuilable. Rear wheel cylinders are sold outright for 94 Pounds each. I'm going to contact SNG Barratt customer hot line to inquire about availability, through their company.
Over the time I have been reading Jaguar World magazine I have seen an English brake component company advertised. I contacted Coopercraft, about their disc brake conversion. It will cost about 1,500 dollars but is very complete and compatible with the original booster. This will probably be the best way to go as everything at the wheel would be new.
I placed a WTB add on the Jaguar forums and will see what might show up.
Oh Well. I really didn't think that it would be that easy.
I know that the car looks pretty scruffy, The remaining paint is quite oxidized. It is quite chalky looking on the sides, if the paint was in better shape I might just try to buff it out for now. So I did. I hit it with liquid rubbing compound and some areas came out looking pretty good. The majority of the rust is on the top surfaces of the roof, hood and deck. I'll also polish up all the chrome and stainless trim. It's kind of a fun project when I'm tired of messing with the mechanicals. Cheap too, just rubbing compound, cleaner wax and chrome polish. I also hit those dried out tires with some vinyl/rubber protectant.
It's about time to get my XJS on the road. Is it ready? Let's see.
Registration, check. Smog check, likewise. Insurance coverage started, yes. The plan will be to start using it around town a bit. I still have to get both windows to open, among other things. Time to get moving- again.
No comments:
Post a Comment