
 |
| photo source: livefromlockdown.com. |
What do I do now?
Luckily, I don't have a lot of spare cash to throw at the problem. Step back, take a breath and look for that detour.
My Wife is going to be out of town for a long weekend with the girls; a three day "crop." For those not familiar with the term, it's a get together to work on scrapbooking and other artsy projects. Doing it out of town at a nice hotel is just an excuse to have a little holiday away from Hubby and the kids. I planned my schedule to accommodate this outing and I'll have several days to work uninterrupted on my own automotive projects. That is if I actually get to work, and dive into some of my longstanding projects. Sometimes it's easier to get up late, have some leisurely breakfast and surf the web over coffee for several hours. The time can easily slip away.
I decided that I want to put some time in on the Mark, it has sat for a few months after my wheel cylinder rebuilding program ran into some unexpected snags. I had redirected my the time on much delayed yard work in preparation of my Wife getting her "she shed," (Quite a silly name.) This shed will lead to the liberation of my garage, at least in theory. So I don't mind putting in the time to achieve my payoff. This is an example of the enlightened self interest that I learned about in Economics class.
As stated, I found that I could not disassemble the wheel cylinders as easily as I hoped. (Actually not at all!) Sitting for twenty five years leads to some stubborn mechanisms. I soaked them with different penetrates to no avail. I shared how I had tried using my hydraulic bench press, heat, and compressed air in an attempt to free them. Only one wheel cylinder yielded to my efforts. Diving into the web for more ideas I read a post that explained how you could hook up a grease gun to the cylinder and use the hydraulic pressure to pop the cylinder pistons out. One advantage of this approach is that the pistons will not be propelled across the room at a high velocity, they will just ooze out of the bore. (This proved to be true.) He made it sound quite easy, just thread a grease fitting into the bleed or hose port and pump the thing full of grease. A high pressure grease gun can develop up to 15,000 psi . I'm guessing that my old unit will be much less, but it will still be more than the 130 lbs. of pressure I could achieve with my air compressor.
 |
| This just like mine. |
 |
| Going at it "Mano a Mano" on the garage floor! |
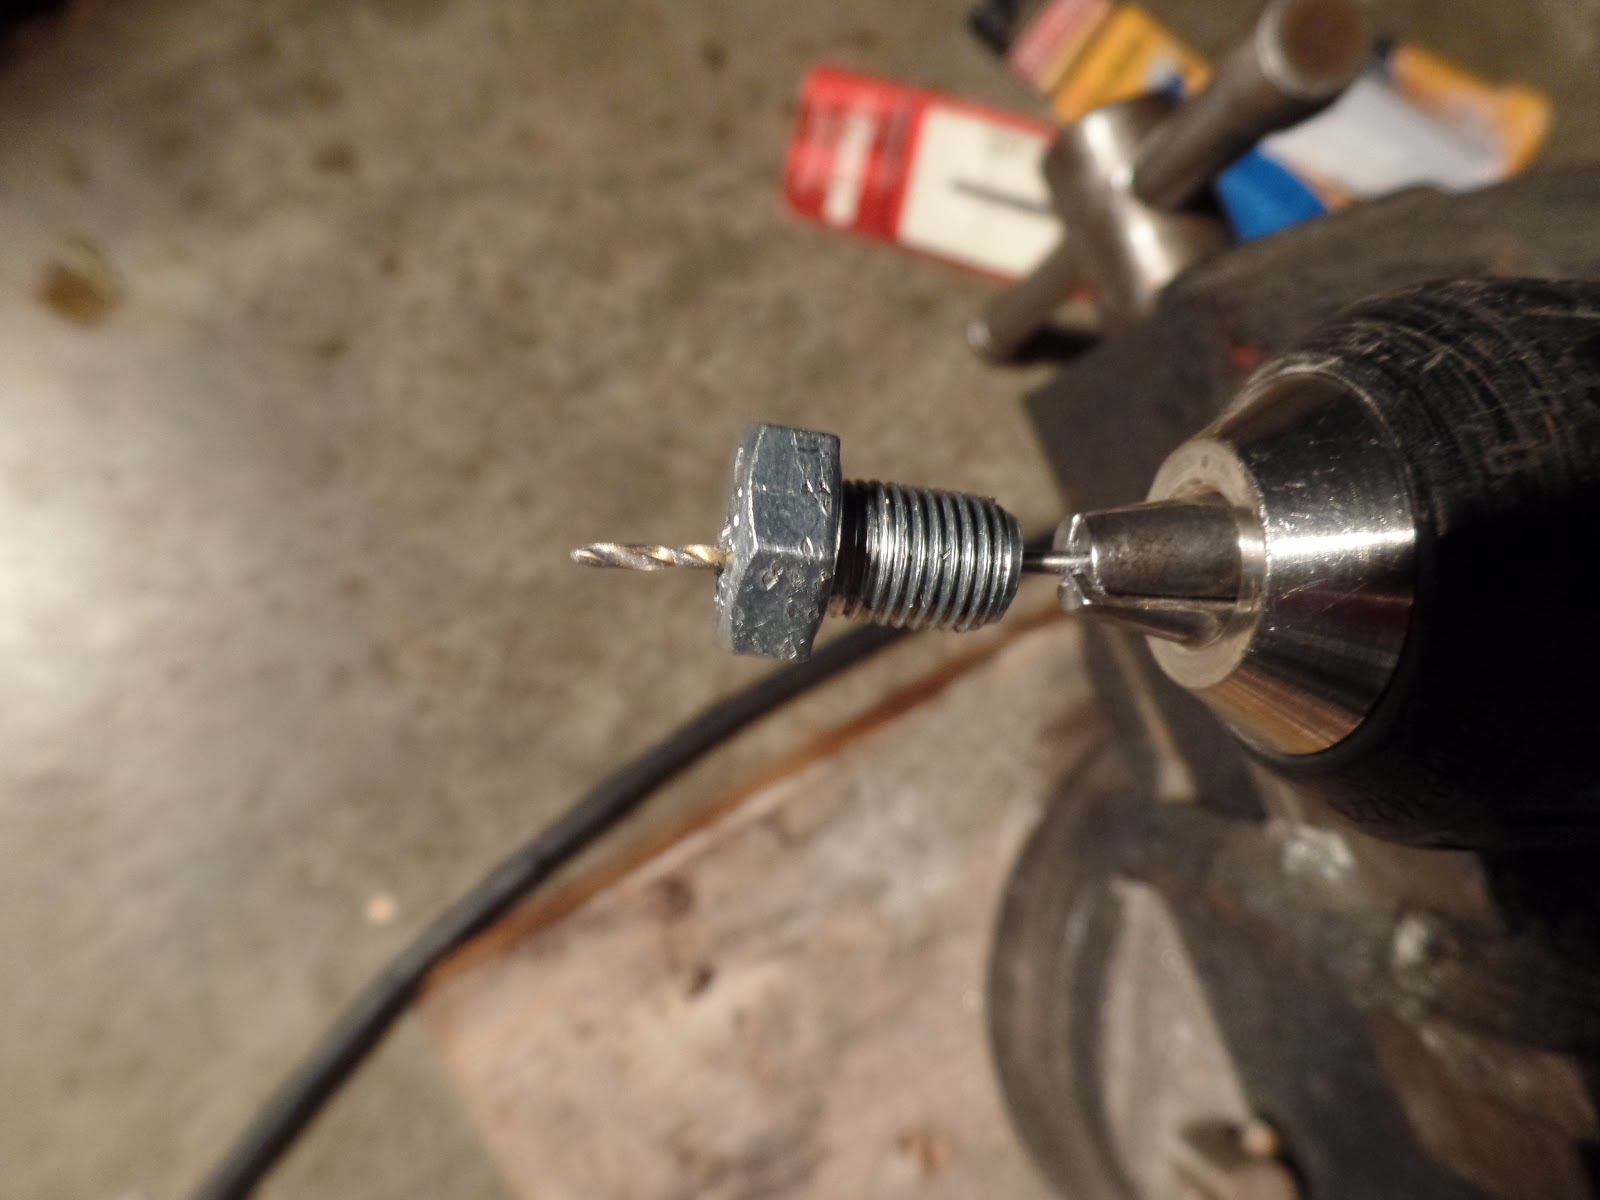
As I mentioned in an earlier post I was unsuccessful in finding some cobbled together fittings that would work. I concluded that I would have to drill out and tap a bolt to achieve the desired result. I considered approaching a machine shop to do the job for me. They of course could easily handle it, but I was unsure if they would even care to bother with such a minor job. I decided I should give it a try myself first. It would have been nice to use a drill press but my old HF unit quit working years ago and had an encounter with the landfill, I considered buying another drill press but figured I would attempt it old school; a hand held drill and a bench vice placed on the garage floor. Without a fixture I would just have to eyeball it. A few more new drill bits would have been nice. Of course I couldn't located my center punch, enough delays. I just dove in.
 |
| With a 1/16 in. drill bit I managed to make a shallow divot in the bottom of the bolt. This would guide the bit for further drilling. |
 |
| All the way through with the 1/16 th, inch bit. |
I began with a 1/16th. inch carbide bit and gently started drilling with my rechargeable Makita until I made a minor divot. Now I had my reference mark. I then switched to my heavy duty Makita plug in drill. I held everything as steady as I could and things went quite well. I went through several bits. It took a long time and I must have been getting a bit tired. When I had drilled almost a half inch I must have pushed too hard and the tiny bit broke off in the bore. Darn It! It was under the surface and I couldn't pull it out.
 |
| I drilled from the top and the bores met in the middle. |
I figured that I would start drilling through the top side and if both bores met, I could drive the broken bit out. I started with the 1/16th bit then moved up to a 1/8th bit. It went okay for awhile until the process came to a halt. It just wasn't going any deeper. I wondered if I'd hit the broken bit since it's really hard to drill through a carbide steel bit. I took the bolt out of the vice and wiped it off. I noticed that the broken bit had been forced out of the bottom bore a bit. That's why it wasn't drilling deeper. I got a 12 inch pair of channel locks and worked that broken bit out like a bad tooth! I ran the 1/16 bit all the way through. I followed that up with the 1/8th bit. Success! Now all I had to do was drill and tap the top of the bolt for the grease fitting.
The grease fitting was 1/4 in x 20 coarse thread. I drilled the top of the bolt out with a 1/4 inch bit and found the appropriate tap in my set. This is the first time I ever threaded a drilled hole. Usually I've just used my tap sets to chase bolt threads. After cutting the threads I tightened the fitting down.
 |
| It worked! Nothing more than a drilled out bolt with a grease fitting, but I was depending on this to work. |
 |
| The ribbon of grease tells me the cylinder is filled with grease. Note that the piston is approx. 1/4 inch below the rim of the cylinder bore. |
 |
| I blocked the crossover port with that old Sportster crankcase stud. |
 |
| It only took a couple of minutes of pumping before the piston was almost completely out of the cylinder bore. |
 |
| Finally! Now to clean out all that grease.
The whole process was not nearly as time consuming as I would have thought. The most time was spent drilling out the bolt. Though I managed to do an adequate job by my crude methods it would have been much easier with a drill press. I should also have bought some extra drill bits. Luckily I had a few on hand. Drill bits are consumables, like sandpaper, paper towels and cleaning solvent. I remember that at GM I would see that the repair men had handfuls of drill bits that they would discard quickly as soon as they lost their effectiveness. Time was money. I sometimes lose sight that my objective is to complete the repair, not save money on tools and supplies. There are sometimes diminishing returns from being a cheapskate!
|
No comments:
Post a Comment