 |
| I covered the fender with a plastic sheet then used a cloth. |
What I mean is, that I hope that preparing the XJS for actual driving duty won't be too long a process.
As I stated in an earlier post, I've got to do some maintenance on the XJS brake system.
First thing was to remove the dirty fluid that's currently in the system. I've used a bubble baby syringe to remove fluid from my '07 Mustang but a turkey baster should work even better.
 |
| It's pretty apparent that the fluids dirty. |
I just sucked up what I could from the reservoir. That was some dirty looking brake fluid. One good thing about using the baster is that I can't remove all the fluid so I shouldn't have introduced any air into the system. So no bleeding is needed yet.
 |
| I've read a few discussions on the Forum but decided to stick with the factory recommendation. |
It is essential to use DOT 4 brake fluid. It is formulated to prevent foaming from the action of the ABS pump.
I plan on draining and refilling the reservoir again, after I drive it for a bit. After refilling then I'll bleed the brake system. Bleeding the rear calipers is supposed to be quite difficult. I'll be sure to document my efforts.
 |
| I think I'll watch some videos on just how to use this thing. |
I bought one of those MityVac hand vacuum pumps which I hope will make the process easier. I think that I might find the bleed nipples somewhat rusty. I've read threads on the Jaguar Forum where posters accidentally broke seized nipples off. This would probably require removing the calipers to remove the broken threads. The problem will probably present itself on the rear calipers. The XJS has center mounted disc brakes. It wasn't a servicer friendly set up, but it remained in use for many years.
I probably won't get into driving the car much until after the Holidays are over. California got the rain we've been needing, but I'd rather not put the car outside in the rain. That bodged up top isn't going to keep the rain out.
I thought that I'd turn my attention to some areas needing work in the interior.
One major problem is that the passenger side window doesn't work very well.
The power rear view mirrors quit working.
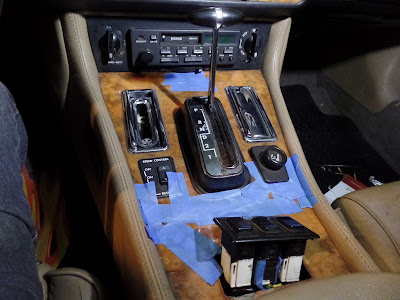
The veneer on the console is cracked.
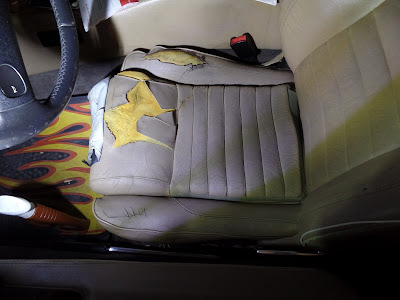
The driver's seat is in terrible shape.
 |
| The location of the blue tape identifies the damaged areas. |
At first I just figured to replace the damaged veneer on the console "ski slope". However the veneer on the upper end was still pretty intact. Down at the bottom near the window controls it is pretty broken up and missing some pieces. Those darn switches don't want to stay in their mounting holes either. Something else to fix.
I started by gluing down the loose edges and cracked and peeling pieces. I held them down with some blue tape overnight. I carefully peeled off the tape and accessed the damage. The area below the shifter lever looks particularly bad. There is a big chunk of veneer missing.
I think that this damage occurred because of the lack of a cup holder. I can imagine a travel mug set on the console dribbling liquid onto the veneer over time. There are plenty of alternatives now available, I'm sure that I can up with something.
 |
| Here's how it looks now. Hopefully the veneer is more stable. |
My plan is to paint over the edges of the cracks with clear nail polish. I'll try to build up a layer of clear polish to hold down the edges. Maybe I can use some touch up paints to try to simulate the missing burl pieces.
Then again, maybe not.
 |
| If you can't fix it why not just cover it up? |
My other option is to cover the damaged area with a piece of leather, wood or metal.
Speaking of covering something up. There is some damaged leather in the cockpit. Luckily it's limited primarily to the driver's seat.
 |
| It looks bad but it doesn't affect the drive-ability. Those flamed floor mats are from my old '66 Riviera |
The bottom of the driver's seat is the worst. The front of the seat cushion cracked off years ago. The seat bolster is cracked also. The leather is so dry and brittle it's like old beef jerky. It's so dry that it would just crack and split if I tried to stitch in a patch.
 |
| Lexol has been a go to product for leather rejuvenation for years. This will be it's toughest challenge. |
I've been treating the area with numerous applications of Lexol in the hopes of softening the leather. I just spray it on and rub it in with my fingers. I leave the surface wet with the conditioner overnight. I don't know if it's possible to restore the leather back to a somewhat pliable state. I would just like to arrest the further deterioration of the seats, even if I just cover it up with some kind of high quality seat cover.
I've seen many threads and videos on restring worn leather sets but they usually weren't as bad as mine. The best option would be to have just the seat bottoms reupholstered. That can wait.
 |
| My twin Harbor freight battery tenders. |
I use these two float chargers to keep my cars batteries in good condition. Both of my Jaguars had been treated to new batteries within the last two years. Quite an expensive proposition especially with the XJ6. It's important to maintain them. I don't keep them constantly plugged in. I connect the chargers every couple of weeks. and also check on them throughout the day. I've read that some "cheap" chargers can get too hot. I haven't noticed that problem. But I do keep my eyes open.
The year is rapidly drawing to a close and I'm anticipating 2020. The next year belongs to the XJS.

No comments:
Post a Comment