
 |
| The marriage of rubber and steel. In this case not a match made in heaven! |
This suspension component is the bane of owners of older Jaguars.
There is a reason that these cars ride so smoothly. There is a lot of rubber in the suspension. Unfortunately, many of these rubber bushings don't have a real long service life. As they wear, slop develops in the fit of the suspension parts affecting the alignment and control of the wheels. This all results in imprecise steering feel, pulling, darting, shudders, vibrations, groans and squeaks. This free play doesn't do anything good for tire life either.
If you buy an inexpensive, used Jaguar, you are usually buying a car that will need quite a bit of deferred maintenance. Rebuilding the suspension is not something that an owner thinking about getting rid of their car would contemplate doing. It's a fairly involved job. Removing springs is a tough job. Tough on any car, even tougher on a Jag which usually uses quite long coil springs. Tough always means expensive.
Since I have to get started on doing something with my fleet, I decided that I'll give my idea a try on the XJS.
I had preferred to work on the XJ6 first, since I will get more use out of that car. However, It does take up a little more space in the garage. Which is still at a premium.
But there are several reasons that I should consider doing the XJS first.
First of all, it's already in the garage. Safe, dry, and warm. I don't want to park it outside until most of the rainy season has passed.
Second, the XJ6 is still usable as it is.
Third, the XJS is the car that I should be fixing and keeping.
Here is the situation as it currently exists. The car is sitting with both front wheels resting on the ramps. A jack will be placed under the lower A arm spring cup. Other jackstands and jacks will be deployed to provide suitable support to the chassis. The lower A arm pivot bolt will be removed. It will probably be necessary to unbolt and move the steering rack up a bit. I might be able to do that without disconnecting the tie rod ends. We'll see.
After removing the lower pivot bolt I''ll lower the jack and allow the lower arm mounting end to drop a few inches below the frame attaching point. This will allow access to a bushing removal tool and I'll be able to drive the old bushing out. Then I can clean up the mounting area and install the new bushing.
What could be easier? Quite a few things, in fact.

This a ball joint remover and installation tool. It doesn't need that much space to access the bushing.
The procedure is illustrated in this video.
video source: YouTube
What could be easier? Quite a few things, in fact.
I'll have to see if I can drop the steering rack enough to remove the lower suspension arm pivot bolt.
As part of my safety plan I will apply a pair of spring compressors to the spring to limit the spring's extension.
I will use a jack under the spring pan to control and limit the amount that the arm can drop.
I need to drop the arm end far enough down to be able to use a bushing removal tool.
This will save me the time and trouble of removing the springs. This would be a huge help to me.
The ball joints bolt to the two piece upper arms. The upper arm should be able to be removed without disturbing the spring and lower arm. At least it seems like this should work.
There are lots of internet videos illustrating how to do this. Nothing specific to the XJS, but close enough to get the general idea.
The big question is if the tool can generate enough force to remove the bushing from the arm.
A very big if!
As you can see from the photo of the bushing at the top of the post, the bushing is just a steel tube with a rubber tube molded/bonded around it, This outer rubber surface is pressed into the suspension arm. This doesn't look like a design that would last a long time. In fact it doesn't. But it's construction will work in my favor. As you can see in the picture below shards of rubber are sticking out of the rear of the opening. It doesn't appear that the steel tube is still bonded to that rubber wrapper. I can't imagine that the steel tube won't be able to be removed easily, maybe even without using a tool. Maybe just drive it out with a few hammer blows?
Other bushing designs have a steel shell that surrounds the rubber, This can often become rusted to the arm and become extremely resistant to removal. This is a common design on American cars.
As you may have noticed the upper bushings still look to be in pretty good shape. I think that their job is a lot easier and their design is also better, as it incorporates a thrust surface. That poor little lower bushing takes a big hit every time the front wheel hits a sharp edged bump, pot hole, crack, or pavement fault. There is an initial sharp impact before the tire rises and rolls over the hazard. All of those impacts have to absorbed by the lower bushings, no wonder that they wear out so soon!
If they wear out before the upper bushings, why not just replace the lower bushings? Just consider them a normal wear item requiring periodic replacement, like brake pads. Why dismantle the entire front suspension? Just replace what is needed. Besides, the other components are easier to replace and do not require the removal of the springs, a big job. I'll discuss these other parts in later posts.
If I'm successful in replacing these bushings without a complete suspension teardown then it will be easier to keep the car in service. How many XJS owners have just parked and forgotten about their cars because they required this kind of maintenance? Especially lowbuck DIYers like myself. In its current condition the car wasn't very pleasant to drive, and it wore the crap out of the inside tread of the tires!
I called one of the better known indie Jaguar repair shops in my area and asked about the cost of a suspension rebuild. They wouldn't even give me a rough estimate, they said that they couldn't give me an estimate without seeing the car. I told them that I just needed a ballpark figure, I wasn't going to consider that price etched in stone, but I needed an idea of the cost. I can't believe that they didn't have a flat rate manual somewhere in their shop!
I applied these spring compressors to hopefully reduce some of the spring's extension when I lower the suspension arm. They can also serve as a safety device to restrain the spring if it were to get loose. I've wrapped a chain or threaded a rope through the coils of the spring as a safety measure before. It doesn't hurt to have a back up.

I'm not always a fan of ramps, but they do allow me more space to move around the car.
I'll probably end up putting some wooden planks under the ramps to gain a little more working space.
Updates will follow in the next few weeks. I'll detail my progress and hopeful success. Then I'll apply my strategy to my XJ6. Stay tuned.
If you buy an inexpensive, used Jaguar, you are usually buying a car that will need quite a bit of deferred maintenance. Rebuilding the suspension is not something that an owner thinking about getting rid of their car would contemplate doing. It's a fairly involved job. Removing springs is a tough job. Tough on any car, even tougher on a Jag which usually uses quite long coil springs. Tough always means expensive.
Since I have to get started on doing something with my fleet, I decided that I'll give my idea a try on the XJS.
I had preferred to work on the XJ6 first, since I will get more use out of that car. However, It does take up a little more space in the garage. Which is still at a premium.
But there are several reasons that I should consider doing the XJS first.
First of all, it's already in the garage. Safe, dry, and warm. I don't want to park it outside until most of the rainy season has passed.
Second, the XJ6 is still usable as it is.
Third, the XJS is the car that I should be fixing and keeping.
 |
| From the ancient manuscripts. This is my idea. |
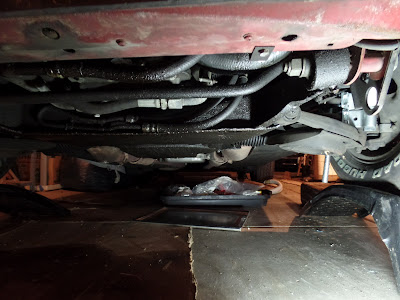
Here is the situation as it currently exists. The car is sitting with both front wheels resting on the ramps. A jack will be placed under the lower A arm spring cup. Other jackstands and jacks will be deployed to provide suitable support to the chassis. The lower A arm pivot bolt will be removed. It will probably be necessary to unbolt and move the steering rack up a bit. I might be able to do that without disconnecting the tie rod ends. We'll see.
 |
| A picture is worth a thousand words. |
After removing the lower pivot bolt I''ll lower the jack and allow the lower arm mounting end to drop a few inches below the frame attaching point. This will allow access to a bushing removal tool and I'll be able to drive the old bushing out. Then I can clean up the mounting area and install the new bushing.
What could be easier? Quite a few things, in fact.

This a ball joint remover and installation tool. It doesn't need that much space to access the bushing.
The procedure is illustrated in this video.
video source: YouTube
What could be easier? Quite a few things, in fact.
I'll have to see if I can drop the steering rack enough to remove the lower suspension arm pivot bolt.
As part of my safety plan I will apply a pair of spring compressors to the spring to limit the spring's extension.
I will use a jack under the spring pan to control and limit the amount that the arm can drop.
I need to drop the arm end far enough down to be able to use a bushing removal tool.
This will save me the time and trouble of removing the springs. This would be a huge help to me.
The ball joints bolt to the two piece upper arms. The upper arm should be able to be removed without disturbing the spring and lower arm. At least it seems like this should work.
There are lots of internet videos illustrating how to do this. Nothing specific to the XJS, but close enough to get the general idea.
The big question is if the tool can generate enough force to remove the bushing from the arm.
A very big if!
As you can see from the photo of the bushing at the top of the post, the bushing is just a steel tube with a rubber tube molded/bonded around it, This outer rubber surface is pressed into the suspension arm. This doesn't look like a design that would last a long time. In fact it doesn't. But it's construction will work in my favor. As you can see in the picture below shards of rubber are sticking out of the rear of the opening. It doesn't appear that the steel tube is still bonded to that rubber wrapper. I can't imagine that the steel tube won't be able to be removed easily, maybe even without using a tool. Maybe just drive it out with a few hammer blows?
Other bushing designs have a steel shell that surrounds the rubber, This can often become rusted to the arm and become extremely resistant to removal. This is a common design on American cars.
 |
| This the front lower mount. |
 |
| This is the rear lower mount. |
 |
| Front upper mount. |
 |
| Rear upper mount. |
As you may have noticed the upper bushings still look to be in pretty good shape. I think that their job is a lot easier and their design is also better, as it incorporates a thrust surface. That poor little lower bushing takes a big hit every time the front wheel hits a sharp edged bump, pot hole, crack, or pavement fault. There is an initial sharp impact before the tire rises and rolls over the hazard. All of those impacts have to absorbed by the lower bushings, no wonder that they wear out so soon!
If they wear out before the upper bushings, why not just replace the lower bushings? Just consider them a normal wear item requiring periodic replacement, like brake pads. Why dismantle the entire front suspension? Just replace what is needed. Besides, the other components are easier to replace and do not require the removal of the springs, a big job. I'll discuss these other parts in later posts.
If I'm successful in replacing these bushings without a complete suspension teardown then it will be easier to keep the car in service. How many XJS owners have just parked and forgotten about their cars because they required this kind of maintenance? Especially lowbuck DIYers like myself. In its current condition the car wasn't very pleasant to drive, and it wore the crap out of the inside tread of the tires!
I called one of the better known indie Jaguar repair shops in my area and asked about the cost of a suspension rebuild. They wouldn't even give me a rough estimate, they said that they couldn't give me an estimate without seeing the car. I told them that I just needed a ballpark figure, I wasn't going to consider that price etched in stone, but I needed an idea of the cost. I can't believe that they didn't have a flat rate manual somewhere in their shop!
 |
| Spring compressor applied to front of spring |
 |
| Compressor applied to the rear of the spring. |
I applied these spring compressors to hopefully reduce some of the spring's extension when I lower the suspension arm. They can also serve as a safety device to restrain the spring if it were to get loose. I've wrapped a chain or threaded a rope through the coils of the spring as a safety measure before. It doesn't hurt to have a back up.

I'm not always a fan of ramps, but they do allow me more space to move around the car.

I'll probably end up putting some wooden planks under the ramps to gain a little more working space.
Updates will follow in the next few weeks. I'll detail my progress and hopeful success. Then I'll apply my strategy to my XJ6. Stay tuned.
No comments:
Post a Comment