
Fixing my truck's rear brakes.
 |
| How hard could it be to install these? |
It should have been easier!
I don't drive my truck very much anymore. I actually only use it one day a week, adding approx. 60 miles a week. So I haven't paid as much attention to it as I should. I have replaced the front brake pads once before, then I had a shop redo the brakes and rotors. I have replaced the rear pads sometime in the past, but I can't recollect exactly when. I started to notice a funny sound coming from the rear axle when I applied the brakes. But it wasn't the squeal that I usually associate with worn brakes. I kind of ignored it until the noise became constant and somewhat worrying.
I had rotated the tires of the truck a year or so ago, and I gave a glance to the rear brakes condition. It looked as though the backing plates of the pads still had enough clearance. The rotors were kind of groovy, there were circular markings that indicated that the rotors were wearing out, but I figured that I'd wait to replace them until the pads wore out.
Well they definitely wore out.
 |
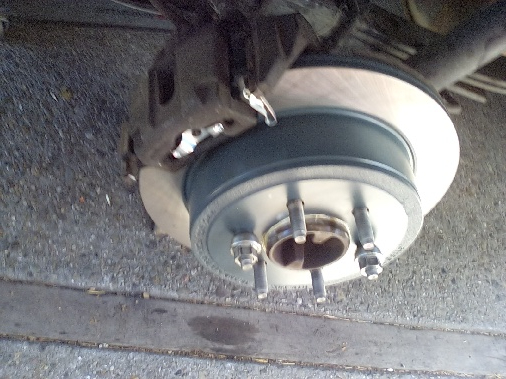
| I initially thought that I could break the rotor loose by tightening a couple of lug nuts using these wrenches as spacers. |
Now there was a constant metallic metal on metal sound as I applied the brakes. I've been really busy recently so I forgot to do a thorough inspection as I needed to use the truck.
Finally it got so bad that I decided to not drive the truck until it was fixed.
As you've heard on the news, California is going through a massive heatwave, temperatures were over 100 degrees during the Fourth of July week. I don't relish working in the driveway with 105 degree temps!
I was going to order the brake parts through Rock Auto, but I wanted to have them on hand and to do the job when I had the opportunity. Delivery can be a long time off with the base shipping choices, and what really burns me is when the items are shipped from two different locations and the shipping cost is doubled.
So I decided to support my local indie auto parts store and buy the parts from them. They should have them in stock, right? Just a week ago I bought a new battery for my '96 Mustang from them. They didn't have their lower priced brake options in stock, but could have them delivered by the next day.
Fine, it cost me twice as much for the rotors and pads as it would from Rock Auto, but it's important to support your local businesses.
It was the day after the Fourth of July, it was going to be close to 100 degrees, but I figured that I'd get an early start. My driveway is shaded until later in the afternoon. I had watched a video that showed the procedure and it was easy, because the F150 uses a small drum brake as the parking brake. Not that awful disc that you have to thread into the piston of the caliper. just pull the wheel, detach the caliper, and pull the rotor off. Simple, until it isn't!
I was going to do one side at a time, only raising the wheel high to gain clearance to remove it. My back has been killing me lately, so I was trying to take it easy. After I removed the wheel and caliper I expected the rotor to come off with only a bit of "encouragement."
This rotor was really worn, from what I could see of the front. When I removed the caliper I saw that the rear pad was completely down to the metal! No wonder it sounded terrible! I had never run a brake pad completely out before. It was the inner pad and it wasn't visible when the caliper was in place. The surface of the rotor was incredibly scored. It's not really an excuse, I should have paid more attention, but I had been very busy and drove the truck so little that it was easy for me to ignore the problem.
The left side rotor was also quite worn, but there was still material on both of the brake pads.
I banged on the right rotor with a dead blow hammer, that should have been enough to free it, but it didn't.
 |
| I tried to get the penetrant into the space where the lugs came through the rotor hat. |
Then I squirted a penetrant rust dissolver into the lug stud holes and around the nose of the rear axle flange. After that, I set to repeatedly hammering around the rotors perimeter to help the penetrant "penetrate" the rusted mating surface.
It refused to budge. After almost an hour, I had the thought, "what will I do if it doesn't come off?" I could just add the new brake pads and let them get chewed up by the scarred rotor, but at least I'd be able to use my truck... for a while. That would also blow the almost fifty bucks that I paid for the pads. And that would be disappointing and sloppy workmanship, but sometimes you gotta do what you gotta do. I needed to use this truck!
I cleaned and lubed the caliper, pushed the piston back with my giant C clamp, then decided to see how the left side would fare. If that one was also stuck, then I'd have to do the shameful thing.
I jacked up the left wheel, put a jack stand under it, pulled the wheel and prayed a little. The caliper came off without any drama, none had been expected. I hit the rotor a bit with the dead blow hammer and the rotor came loose quite easily! I decided to replace the parts and reassemble the left side completely then turn my attention back to the right side.
The rotor was also worn, but the pads weren't down all the way to the metal.
 |
| The left side rotor came off easily. |
 |
| Not to the metal...yet. The surface of the rotor didn't look this good in reality. |
I was taking regular breaks to hydrate and rest, so I decided to search the web for helpful videos.
One tip was to strike the rotor "hat"area with double hammers. Hold one hammer in contact with the hat surface, and strike the first hammer with a bigger hammer. I set to work and it sounded like the Hammers of Hell! Clang! Clang! Clang! That went on for what seemed like an eternity, with no visible results.
I had tried a small pry bar with no results, so I switched to a full size crow bar! I carefully priced between the caliper mounts and the rotor.
Another video tip was to make a screw type expander out of a large bolt and nut, but my brakes didn't have an available large bolt hole. The second tip was to use a butane torch to heat around the hat area. This seemed to work quite well.
I thought I'd try something after lunch.
 |
| Clever is as clever does! A third World solution to a First World problem! |
My morning shade had disappeared by now, I was sitting directly in the 100 degree heat. Even wearing my yard hat wasn't enough protection, but I got an idea. I got a large piece of cardboard and balanced it on the roof of my Navigator which was parked in the driveway next to my truck, and the truck bed side. This functioned as a lean to roof and gave me the shade that I desperately needed.
I didn't have a butane torch, and I was a bit worried about applying a flame to a surface that was soaked in petroleum distillates, but I had an electric heat gun that could produce 1100 degrees F according to the box. I also got my fire extinguisher and laid it close to hand!
I mimicked the heating pattern that I'd seen on the video and saw that the penetrant was evaporating from the surface, as well as a thin plume of smoke rising from behind the rotor! I also was banging on the rotor with my double hammers and prying with the crow bar with no results. There was an initial "give" in the assembly, which made it hard to maintain constant pressure.
Things were not looking good.
I thought that maybe I could force "something" between the caliper mounts and the rotor. I had a small ball joint splitter, but I had something even better, a pickle fork!
 |
| Sometimes the job calls for a bigger hammer. |
I could hammer the tapered fork into the gap, and that would maintain pressure. I applied more heat around the hat between the lugs. It must have certainly gotten hot after repeated applications. Then I would rotate the rotor and hammer the fork in. It started to work, as I rotated the rotor and repeated the procedure. I could see the darn thing starting to slowly creep towards the end of the axle flange!
Finally success! Then it was just cleaning and installing the new rotors and brake pads, and the cleaned and lubed caliper.
 |
| The outside of the right rotor didn't look that bad... |
 |
| The inside rotor surface and that bottom pad, Yikes! |
 |
| It does not look better in a close up! |
I applied some grease to the mating surfaces to hopefully avoid this same situation in the future. That rotor had sat in place for 17 years! I would bet that the OEM rotor fit a bit tighter than an aftermarket unit, as the factory would want the rotors to stay in place as it went down the assembly line. There weren't any retaining washers used on this assembly.
 |
| The grease should do the job. |
I had thought that I could complete the job in an hour and a half, it actually took me almost four and a half hours. Still I was happy with the results and had restored my truck to operating status. The brakes are now quiet and velvety smooth. It took me the rest of the day to cool down.
 |
| Shiny clean and new. |
Victory, sweet victory!
No comments:
Post a Comment