More progress on the XJ6, Repairing the broken cup holder in the front arm rest.
I will be using the super glue/ baking powder procedure.
In the above picture you can see how the hinge pin is still intact. This Jaguar was an expensive car, yet it was still filled with plastic mechanisms and parts that will only break over time. You might think that it would have higher quality metal hinges, but I'd bet that this assembly was made by the same suppliers that provided parts to the Detroit automakers. Either way, we have to find a way to fix and preserve these old cars. I found several videos on YouTube that demonstrated the super glue/ baking soda repair.
Super glues have been around for decades and while it was shown to be effective holding a workman's helmet to an overhead beam, it has been problematical when applied to auto restoration and repair. For one thing it doesn't stick to every plastic. ( But it sure sticks to your fingers!) Second, it doesn't provide enough strength to hold and support the fracture point on a thin material joint. It works fine on china cups and vases, less effective on a cracked plastic part. It really needs more surface area at the fracture site to be effective.
This is what the "good" side looks like. Just a typical injected plastic hinge assembly. Force applied to this area eventually resulted in the pin pocket cracking and then breaking. This resulted in the folding cup holder skewing sideways and popping open, where it would sloppily hang to one side. When I first bought my car, the cup holder was intact and still working. I have never been a fan of the "two holes on the console" approach to cup holder technology, though there is nothing to break, but they do tend to collect spillage, crumbs, and dirt. They are also not very attractive. At least some cars have a sliding cover over that opening. I may have contributed to the breakage by my use of well oversized aluminum coffee carafe/cups. They are big, heavy, and can exert a lot of leverage against the mechanism. I'll show you what I mean at the end of the post. I recall an incident where I was cut off in traffic, I slammed on the brakes and the coffee carafe was launched into floorboard.
This was the only piece of the existing hinge pocket that I could recover. It's best to try to recover any pieces, they can be glued into place and will provide a foundation/framework for the following repair.
Less than half of the existing structure is still intact. I studied the arm rest/ cupholder assembly but couldn't determine if I could disassemble the hinge, repair it, then reassemble it. So I decide that I would position the pin in the pocket and build up the surrounding area with "the mixture."
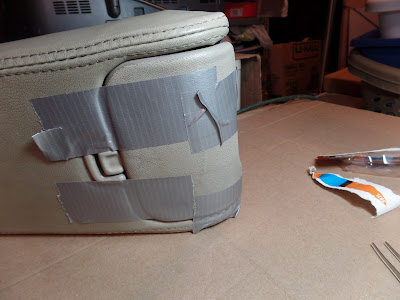
First I masked off the pin so that the glue wouldn't stick to it. Then I positioned it back in the pocket and securely taped the cupholder in position within the arm rest. I taped it on both sides, making sure that it was aligned properly.
I secured the cup holder in place securely.
Both front and back.
Then I glued the plastic fragment back into place. I didn't have to worry about where the glue went, it couldn't affect the movement. Unfortunately I forgot to photograph this step. It was just gluing a broken piece in, nothing out of the ordinary. I just had to be careful not to break the newly glued on fragment.
Just baking soda and a baby dropper. I don't know if the super glue and the baking powder create some kind of chemical reaction or if it just a physical bond. While baking soda dissolves easily in water, in superglue it seems to soak up the glue, kind of analogous to sawdust absorbing oil. Except that this mixture will cure "rock hard!" There is another method where regular writing paper is used as a laminating material along with the superglue. Depending upon how much access you have to the broken area and the nature of the broken part, for example, if the broken part is a large flat tab, will be the determining factor.
I was going to fix this while the parts are in place, in the proper position.
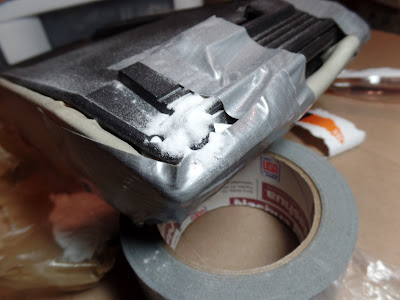
The first of several applications. It was far too much baking powder, but that's okay. Baking powder is cheap and it's only going to stick where the glue is. Just shake or blow the excess off. Repeat until there's a good build up.
Here's what it look likes after a build up. Not too attractive but it's on the underside where it's not going to be seen. Of course you can file it smooth and paint it if necessary. I didn't want to weaken the joint by sanding it. Maybe I'll put some black paint on the repair in the future.
Looking at the area from the top. The other side of the hinge pocket now needs to be built up. When I'm finished all the blue should be covered up.
The first of several applications. The advantage of the powder repair is that as long as you can apply the glue the powder will also find it's way to the spot. It's easy to build up the area.
My Wife asked why I didn't try to use a catalyzed polymer putty, something like POR 15, she uses a non branded type for her crafting. POR 15 is good stuff, it is very strong and easily formed. The question is whether it will stick to the particular plastic you are trying to repair. The other is whether you have the access to apply the material and shape it. These putties can be great solutions. I once used POR to form a rusted out section of wheel lip on one of my old Datsun Zs. Once cured and painted you couldn't tell it from the metal.
This was after I'd tested the mechanism several times. I open and closed the cup holder carefully. At first it was a bit stiff, but as I anticipated, as the tape wore away it loosened up nicely. I finished up by cleaning the arm rest with Lexol cleaner
These are appropriate sized drink containers. These are the only types of containers that I should place in the holder. The weight of the item is supported by the plastic panel that forms the arm rest. The stress on the mechanism comes from an item forcing the hinge past it's limits. Too much force will crack the hinge pin pockets. My use of the oversized coffee containers wasn't going to contribute to the long term health of this assembly.
This is not a good idea. Look how much leverage this item can exert. That's what happened when I slammed on the brakes and launched it into the floorboard.
These repair procedures and more, can be found on the YouTube site, Sweeet Project cars.


No comments:
Post a Comment